When Japanese Tier One parts supplier Ogihara introduced its revolutionary manufacturing system it needed to bring OEMs up to speed with a user-friendly measurement data solution. CogniTens’ Optigo technology provided the means at just the right time
Six years ago, Ogihara’s quality team in North America went through a very comprehensive evaluation of its quality systems. Employing conventional checking fixtures, data mites, measuring tools and coordinate measuring machines (CMMs), it verified that the company was right on track with its customers’ quality requirements.
End of story? Far from it, according to Steve Peca, Executive Manager, Ogihara North America. The Japanese company, a Tier One supplier of Class A parts, assemblies, and related body panels to North America’s leading carmakers, found that while it was succeeding on quality Ogihara was still essentially reactive in everything it did.
“Even though we were following the OEM guidelines, we were still reactive because it’s very hard to predict and catch what’s going to happen with conventional tools,” says Peca.
“Of course, we had CMMs, and we could run capability studies and chart things out, but it was very difficult to convey that information throughout the organisation. Our CMM and hand tool measurement outputs were very technical and cumbersome to use. The CMM reports involve hundreds of pages of data, and we’d have to make roadmaps and pictures, sketches, and try to convey that throughout the organisation.”
By transforming their quality processes to a more proactive approach, Peca and his team knew they could raise their quality standards even higher, as well as getting more of their own and their customers’ organisations on board by simplifying the data.
The quality team’s solution to the problem was the Ogihara Manufacturing System, a proprietary process that is now in use at Ogihara facilities around the world. Through product design, tool shop, stamping, and OEM assembly plants, the system identifies nine quality-reactive loops.
Unfortunately, five years ago, when the system was first developed, the methodology was a bit too revolutionary for the measurement technology then available. “The data we had was not rich enough and it wasn’t easy for the whole organisation to understand,” says Peca. “Our CMM guys understood it, but it takes the whole team to make your company work. Not everyone was on the same page. How do you communicate the data to the whole organisation? We needed to make it more user-friendly.”
Peca and his team bounced back and forth between Munich and Michigan benchmarking different measurement solutions that would fit the process, but none of them were able to handle the vibration in the plant environment. “The acquisiton time, the lighting, and the high/low vibration coming out of a stamping plant just destroyed the data that we were getting out of conventional scanning tools. We were ready to roll with our process, but we didn’t have the tools to make it work.
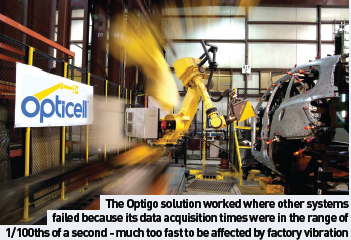
Then Peca came across CogniTens’ Optigo technology, a white light camera solution that utilizes photogrametry to collect measurement data. The technology, all of which is non-contact, basically works in the following way: if you’re measuring a car fender you put reflective targets on it and use a mapping camera to ascertain the geometry. Once mapped, you use the Optigo system to take pictures of the fender which are used to generate a pdf data set that you can convert into STL and go from there. The reason the Cognitens solution worked where conventional technologies failed is because the system’s data acquisiton time is very fast. “It takes 1/100ths of a second to take one picture. Because it takes the shot so fast, the vibration in the plant doesn’t affect the data integrity,” says Peca.
So Ogihara started working with CogniTens to complement its manufacturing system. “It was excellent,” says Peca. “We integrated it step by step. We came up with an implementation strategy and started it out with the stamper for our first try outs. We taught our CMM people how to use it and make the data. Then we took it to the die shop and taught those folks, and on into assembly. We implemented the technology step by step throughout the year, educated ourselves on how to use it and what the data outputs looked like. Once our associates understood it, the people on the lines began approaching the quality people and turning in root cause analysis forms on their own. Of course, the quality guys still do the root cause analysis, but now it allows the associates to take some ownership for root cause analysis because they understand the data set we’re giving them. They can immediately correct issues at Ogihara, which in turn means the customer never sees poor quality off their lines.
| Bodyside | Door opening | Luggage compartment |
| Boxside | Fender | Quarter inner |
| Dash | Frame | Roof |
| Door | Hood |
“For example, let’s say we’re running a door and the associate on the line notices that when they load the door into the fixture, it’s out of tolerance a bit. The associate will then contact the layout group. They dispatch one of the portable Optigos there, they’ll shoot the door, and find out the problem is because of a small part coming in from a lower tier supplier. They shoot that part with the camera, find it’s out of tolerance, determine that the parts in a particular bin are no good. We then contact the supplier, notify them of the issue, and have them replace the parts. The data we send them is nothing more than a simple paint cloud file that’s easy for them to understand and correct. They fix the problem, send us a new bin, and everyone’s happy.”
Time-sensitive troubleshooting
At the other end of the supply chain, Peca says Ogihara once had a customer issue involving a fuel door to a body side. Ogihara was supplying the OEM with both parts but at the customer plant there were problems in attaching the fuel door to the body side; they called Ogihara to find a solution to the issue.
“In one day we scanned our body side, scanned the fuel door, and discovered that they were both to design intent and there were no issues on our end. We then dispatched our people to the OEM where we again scanned the fuel door and body side as they were unloading them. Again we found they were to design intent. Once they attached the fuel door to the body side, the fuel door attachment bracket was stronger than the body side attachment bracket. It turned out the OEM’s associates were bending the brackets with their wrenches. We had our people shoot the fuel door on the body side and it showed exactly what the problem was.
| Chrysler | Mercedes Benz | SIA Isuzu |
| Daimler | Mitsubishi | SIA Subaru |
| Ford | Nissan | Toyota |
| General Motors | Saturn |
“The next morning we presented our findings to the customer and it made our relationship stronger because we were able to show them our products at our plant, at their facility, and on the vehicle, and we were able to show them where the process was failing. The customer addressed the issue, we rescanned it, and the products are fine now. That took one day; with the old technology it would have taken a week.”
It’s often the case that production developments – things such as plant requirements, tool moves, realignments, functional builds, and so forth – mean that eventually not all the components on a vehicle necessarily conform to the original CAD design. Parts have been moved around to accommodate the vehicle build process. On the customer side, after a few years when an OEM wants to reclad a vehicle, perhaps put some new headlamps or moulding on it, the current North American OEM process is to take the CAD data for the vehicle to the suppliers and ask them to rejig their products so it fits the new CAD data.
“With our process, our customer receives a scan of the part we produce. They’ll also receive statistical information that indicates the capability of that part. That in turn allows the customer to design their part to fit our part first time.
If they design and build to our data, and our parts are capable, their part will snap right in place and there won’t be any quality reactive circles happening,” says Peca. “By performing this process at Ogihara, we save our customers a lot of revenue and it doesn’t cost them anything else, they’re getting the data anyway, they just use it to design around.”
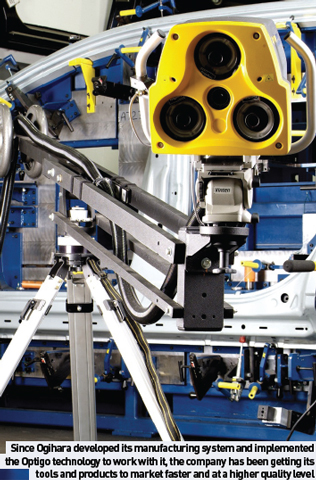
Peca says that since Ogihara developed its manufacturing system and implemented the Optigo technology to work with it, the company has been getting its tools and products to market faster and at a higher quality level.
“We’ve also strengthened our relationships with customers because we’re showing them the true product in a comprehensive format. We’ve realised less quality reactive loops, and we’ve developed an intelligent workforce that, by utilising the data generated by our scanning systems, has increased our quality control department throughout the manufacturing area – from engineer to associate. The associates understand that they can scan a product, do root cause analysis and fix problems quickly. We’ve also doubled our output in layout requests. Before, using conventional CMM technology, we were running around the clock with four people. We can now do the same work with two people on one shift. We’ve basically doubled our output.”
The next step for Ogihara is to continue working with the OEMs and assist them in the development of their process. “Our customers are family, we all have a job to do, and we do it well – all of us together. We’ve approached the OEMs and we’re going to be working with them as partners, helping them receive and understand Ogihara data. We’re going to help them understand virtual assembly and work together as a team for root cause analysis. Ultimately, we’ll help them make their vehicles better and get them to market faster.”


