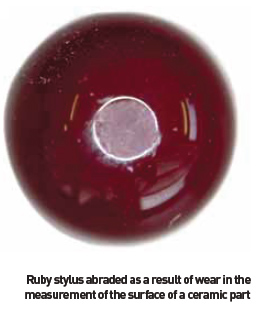
 Only the different gloss level of the surface shows that the ruby stylus of the coordinate measuring machine (CMM) must scan a rough surface. “This is often not good for the stylus,” according to Dr Frank Richter, responsible for stylus production at Carl Zeiss. “When measuring very hard materials, the stylus wears out. With soft materials, it creates a coating that cannot be removed and has a negative effect on the measuring result.” At least, this is the case with styli with a ruby sphere. Several customers approached Dr Richter with this problem, because stylus replacements are expensive. The only solution is to remove the stylus, no matter whether its abrasion measures only 1 μm or the size of its sphere has increased by only a few micrometers due to the formation of a coating. This is because the material – mainly soft aluminum alloys – can no longer be removed. When analysing this problem, engineers at Carl Zeiss 3D Automation discovered that the surface structure of the measured objects is decisive. They found that damage of this extent does not occur with point probing. Abrasion or materi formation was only observed in the actual scanning process itself, that is, when the stylus is moved over a surface. As a result, the engineers had to fi nd a measuring sphere that is so hard as not to wear out with hard and rough materials and to which no soft material adheres. “At fi rst, we experimented with silicone nitride,” says Dr Richter describing the development path, “but it was not before a supplier of industry diamonds was able to produce spheres that the experiments yielded the required results.” - www.zeiss.com
- Plant Functions
- Smart Factory
- New whitepaper: Driving carbon transparency in automotive supply chains
- Register now: Scan-First Digital Twins: A reality capture roadmap for agile, ROI-focused brownfield transformation
 Arno Guellering on harnessing shopfloor visualisation and genAI in Draexlmaier production
 Watch now - Futureproofing factories: Agility and flexibility in production
- Electrification
- Automation
- Sustainability
- Events
- Companies
- Materials
- Regions
- Kaizen
- Video and Audio
- Register now: Scan-First Digital Twins: A reality capture roadmap for agile, ROI-focused brownfield transformation
- Watch now: Automotive Gateway Mobilizer - Mastering Communication Challenges in Battery and EV Components End-of-Line Tests
- Watch now: Digital Transformation at Inflection Point within Automotive Manufacturing
- Magazine
- Surveys & Reports
- Newsletters
- Partner Content
- Whitepapers
- Media Pack
- Register
- Sign In


