Quality inspection in car body construction is moving towards more speed, greater flexibility and the use of intelligent software, writes Judith Schwarz
 The automotive industry is placing new challenges on car body construction: more flexible and increasingly complex production processes and systems are required as the number of models grows. Increasingly, process and production techniques are being rolled out to other sites from lead factories in an effort to shape globally networked production activities efficiently.
However, this requires comparable employee qualifications and training, as well as corresponding support at each location. Additionally, more stringent environmental standards have resulted in a growing range of newer, lighter materials such as fibre-reinforced composites. The introduction of such materials entails new production methods, which must take into consideration the diverse properties of the materials, eg surface structures. On top of these latest developments, the automotive industry continues to emphasise increased throughput, reduced costs and rising quality. Carmakers today must meet all these challenges.
This has also had an effect on car body and inspection technology – on both the reference measurements in the measuring lab and on in-process inspection technology on the production line. According to Dr Kai-Udo Modrich, head of Carl Zeiss Automated Inspection GmbH & Co. KG, these current developments can be broken down into three higher-ranking trends: “Measurement and inspection technologies are becoming more flexible and quicker. In addition, intelligent software systems will become increasingly important to the analysis and documentation of the data,” he says.
Finding flexibility
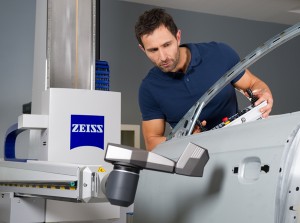
Shorter start-up processes in carmaking, a growing number of models and a wider range of materials demand increasingly greater flexibility – not only with car body construction, but also with in-process measuring and inspection technology. In a measuring lab, where highly accurate reference measurements are taken, this flexibility can be achieved through multi-sensor measuring machines: these combine one or more optical sensors with a contact sensor on a single system. Recent developments have also eliminated the need to switch to a surface-measuring machine. For example, the ROTOS roughness sensor from ZEISS enables standard-compliant capture of roughness and waviness on a single co-ordinate-measuring machine. As a result, size, form, location and surface parameters can be measured on one machine in a single process step. The time-consuming rechucking and transport of the workpiece to another machine is no longer necessary.
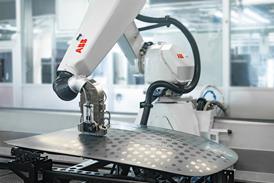
The incorporation of optical measuring and robots to in-process inline measuring also improves flexibility. A robot equipped with an optical sensor is capable of capturing multiple measurement points at various locations on a car body. Upon completion of a process – for example, welding – up to four robot systems equipped with camera sensors move to the car body parts. As a fixed element on the production line, they check anything between 80 and 100 points on the workpiece within around one minute. Using multi-line triangulation sensors, they check the extent to which the location of slotted holes and bolts, for example, deviate from the nominal position. These robot-guided sensors are combined with fixed sensors in hybrid cells. Fixed sensors are used to measure the undercarriages, which the robots cannot reach.
The integration of different optical principles on one probe also generates greater flexibility for inline measuring technology. The ZEISS AIMax sensor, for example, combines three optical measuring principles in a single probe: multi-line triangulation, grayscale image processing and a new method to measure bolts. For the latter, the workpiece is illuminated from several directions. The geometry can be derived from the calculation of the various shadows.
The sensor was specially developed for the robot-guided 3D inline measuring of boreholes, holes, screw threads and bolts. The multiple sensors on the system, and the variable illumination, allow it to capture measurement features on surfaces with varying degrees of roughness, contamination and reflection. Thanks to its compact size, it can also be deployed in tight spaces and for inclined measurements of certain features. According to Dr Modrich, when combined with a robot, this probe embodies the “flexibility that can already be achieved in car body inspection technology for the growing range of models and materials.”
Modular measuring and inspection equipment enables swift responses to changing requirements and is another development from measuring-machine manufacturers that allows carmakers to achieve maximum flexibility.For example, the modular ZEISS PRO advance measuring machine can be enhanced with a new stepping and continuous articulating probe holder that can be calibrated for all angular settings within six minutes.
Stepping up the speed
Higher demands on quality and new technology in the automotive industry in recent years have resulted across the automobile industry in total in-process inspection. Additionally, more frequent changes to product lines, as well as the larger number of models, make it increasingly important for start-up processes to run as quickly and efficiently as possible in order to reduce costs and time to market. These trends mean that measuring and inspection systems must also be faster.
Accordingly, car body manufacturers increasingly rely on optical measuring and inspection technology instead of contact methods. After all, a camera or triangulation sensor captures more information in less time than a contact sensor that scans line by line. Even if optical sensors cannot completely replace contact measurements, their speed alone makes them indispensable – and they are becoming faster. For example, in July 2014, ZEISS introduced an optical sensor for car body metrology that is five times faster than its predecessor. The ZEISS EagleEye sensor allows the fast measurement of boreholes, bolts, edges, sections and freeform surfaces on a car body. This enables maximum quality evaluations of the results with information on the diameter, location and form of the part feature that is accurate down to the micrometer.
“Thanks to the higher throughput on the measuring machines, part deviations can be detected earlier and corrective measures implemented quickly,” stresses Dr Modrich. “It was important for us to ensure that the increased speed of the machine did not lead to a loss of accuracy,” he adds.
Given the trend towards acceleration and optical measuring and inspection technology, another aspect must be taken into account: point clouds are generated in just a few seconds and contain significant amounts of data that must not only be recorded but also saved and analysed. This demands high-performance IT systems that can process large quantities of data quickly.
Intelligent software
Closely related to the trend towards acceleration is the growing relevance of IT in measuring and inspection technology. For example, faster start-up processes and frequent model changes require a drastic reduction in the time required to install measuring and inspection technology. This makes virtual start-up of measuring machines more important. It opens up the possibility of simulating the measuring and inspection process using CAD data long before any actual installation. Ideally, this takes place wherever possible within a consistent simulation environment that incorporates such features of the robot program as, for example, the illumination parameters of the optical inspection technology. “The early use of simulation tools and good project management permits reductions in installation times by a factor of two or three compared with what could be achieved just a few years ago,” explains Dr Modrich.
IT is also vital to the analysis of measured values. Users require assistance in order to make decisions quickly despite the constantly growing amount of data. According to Dr Modrich, this will occur in future with the help of intelligent software that merges and analyses all measurement and inspection data. Ideally, the data from each workpiece is tracked along the entire production process. As a central data platform, such a tool can also run the comparisons between data from the production line and the highly accurate reference values from the measuring lab that are often necessary.
Systems such as ZEISS PiWeb statistics software merge all measuring and inspection data, analyse it independently and provide graphical representations of the results. In the future, these systems will deliver concrete suggestions more often than they do now. Furthermore, on top of their dedicated quality inspection function, they will provide valuable feedback to design and production planning, which will enable enhancements to processes and products. “Measuring technology in the future will not only monitor and document quality but will also control entire processes,” says Dr Modrich.
However, this can only happen if individual employees can manage the increasingly intelligent IT solutions. In his opinion, they require customised user interfaces with reduced complexity if they are to be used across the board by quality managers, production heads and machine operators in Germany, Mexico or China. “In the future, providers of measuring and inspection technology will have to invest more into these requirements,” Dr Modrich predicts. He believes that integrated systems will replace individual measuring technologies. They will be comprised of inspection technology for inline inspection, highly accurate technologies for reference measurements in the measuring lab, and a software platform that will centrally merge, analyse and document these values, and then provide feedback to design and production planning.


